
.webp)
Image Variation: Make variation or help to find inspiration
Start by uploading a reference image. Then, customize the strength number to adjust how closely the generated images resemble the original reference. Finally, select desired quantity of output images and the artwork pieces meeting your specific requirements will be generated.
.webp)
Background AI: Generate realistic, studio-quality product images in seconds
Start by uploading a product image and AI will remove the background automatically instantly. You can choose to download transparent background or choose solid color background on the top left corner. And if realistic life-style background is needed, click ‘Generate Background’.
.webp)
There are 3 flexible ways to generate background for product:
1. Choose pre-defined filters is the simplest way and you can choose different categories first, then choose various scenes on second row.
2. Freeform is most popular choice since it gave most freedom how you want to describe the background. Yet, some prompt engineering is needed there.
.webp)
3. Ref Image is by far most practical way to generate product image you exactly want. Simply find the matching background or popular background for your product, upload it in the ref background box below. Then you will need to resize and move your product to the correct size and position and hit create. After a few seconds, you will get the ideal product image you want.
.webp)
Swap Anything: Photoshop any image with one click
After image is uploaded, AI will automatically segment different parts and you can simply click on the mask area where you want to change. If you want to make selection more precise, you can use ‘Remove Area’ to click on the area you don’t want (red dot), and ‘Add Mask’ to click on the area you hope to add (gree dot).

After mask is selected ready, hit ‘confirm mask’, (you can always go back to reselect mask choose button on the left side), type in description of the part how you want final result to be, and hit create. AI photoshop result will be ready in few seconds on the right.
.webp)
Image Results & Actions
Improve your images using four buttons.
.webp)
Restore: restore the flawed original picture
Enhance: add extra details to the original picture
Upscale: increase the resolution of pictures to 4k
Edit: change the background or anything else
Image History
To view your generated images, simply navigate to the 【My History】 tab located at the top of the page.
All image prompts and results will be stored here, allowing you to easily access, download or share them at any time without fear of forgetting to save them. Currently for free users, there will be limited storage in history and you can always upgrade to expand your storage for all valuable images
.webp)
Prompt Guide
AI-Creator ai can generate any image with only text prompts. Such a tool allows everyone to enter any description they want freely, so as to obtain funny, amazing pictures
AI-designer , can modify photos with prompts, like changing background or replacing a part in pics, which can be a good assistance to those who have a high requirement for photos
AI-Creator
Enter the official website link(https://imgcreator.zmo.ai ), and fill a text description in the blank. For example:a little boy is flying a kite. You can even enter a poem or lyrics, no matter what you can imagine, AI will generate it for you
How can you master creator better?
As a new comer, you may worried that you are unable to use prompt (keywords) accurately,then the results will be disappointing. However,the biggest difference between imgcreator and other AI drawing tools is that there is no need to use specific magic words, just describe in simple keywords or sentences. The following are the skills I have summarized
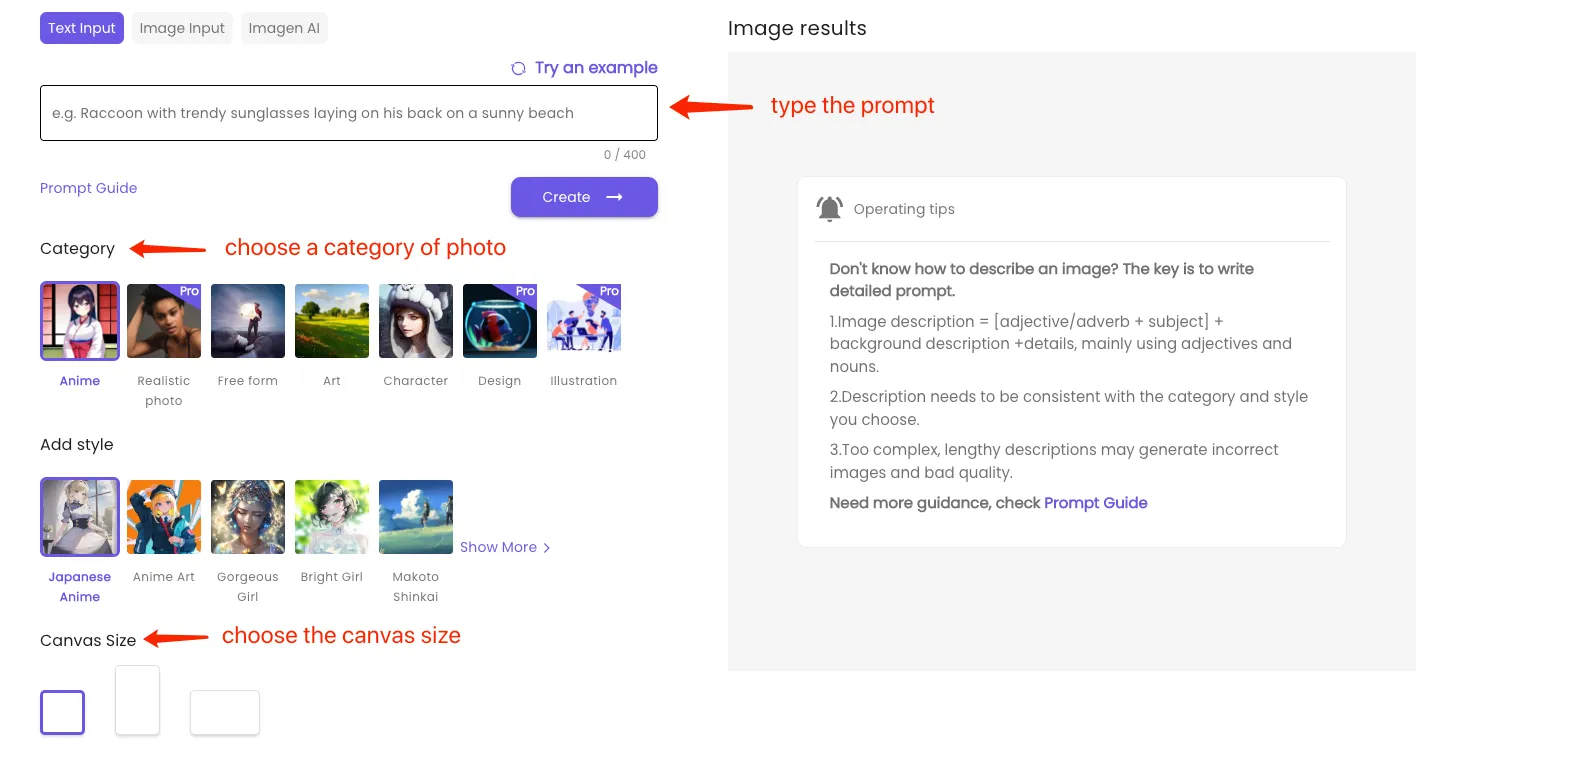
1. Scene description = [adjective/adverb + subject] + background description + details You need to describe as clearly as possible what you want to present: the background, the details. Different specific descriptions and styles will directly determine the effect of the picture. Here are some examples:

If you have no inspiration for the time being, you can also click “Try an example” at the top right of the texting box to randomly generate keyword sentences for users to learn. Just start copying directly!

1.2 Picture Category
The artworks that imgcreator generates concludes six categories:Anime, Avtor,Art, Realistic photo,Design,Illustration. Selection of category will directly affect the final quality and style of the picture. Pictures with the same description but different categories have completely different visual effects on users.

Each category has more than four styles for users to select, you can choose your favorite style according to the scene you describe and the category you want the picture to present. Including the classic style like Ukiyo-e, Van Gogh, Monet and so on. What’s more, it has Hayao Miyazaki’s style and One Piece style! Just entering the corresponding keywords, you don’t need any art foundation at all.

Combining the above three techniques, I believe you have mastered the basic function of this tool. But there are a few tips to note:
– Due to the different algorithm models, if you blindly pile up the “mantras” that are commonly used in other products, such as octane rendering, plasma, it may be counterproductive
– At the same time, your description also needs to be consistent with the category and style you choose. For example, if you choose the style of “Van Gogh”, while your aim is to generate a realistic photo, the final result may not be satisfying
– If you want to enrich the details of the characters, you can add “close-up”
– Too complex, lengthy descriptions may generate incorrect pictures and texts. Example: ‘Queen Medusa,Muscular man, Skeleton, the chains were entangled with wild wolves,countless insects with dragonfly wings like purple centipedes floated in the air. From the cracks in the rock, there were huge colorful snakes
Observed from the result, it seems that AI has a long way to go to understand complicated sentences

1.4 Free Form
I think you might have already noticed that there is a ‘Freeform’. Freeform format doesn’t need users choose category or style. You can just type what you want. But please make sure you have input a highly detailed prompt, otherwise you will be unsatisfied with the result

For example :3d octane render, stunning beautiful sweden adult female with profile face, rim light, big leaves and stems, gold roots, gold fine foliage lace, alexander mcqueen, gold art nouveau fashion embroidered collar, steampunk, silver
2. AI-Designer
Equipped with PS function is one of our highlights. Sometimes, the results generated by the AI may not meet your requirements, or there are places where you want to modify in order to achieve a more perfect result. At this time, the writer strongly recommends that you take full advantage of imgeditor ( https://imgeditor.zmo.ai ) to improve.
With only three steps, you can become a master of Photoshop.
1. Upload the pics need to be edited

2. Erase the part that you want to modify
3. Fill prompt in the below blank, like ‘there is an Monet’s style painting hanging on the wall
As we can see from the result, AI not only helps me replace that painting, but also out-painting my original pics. Space in the room is larger. Surprisingly, it finished within a few seconds
However, nothing is perfect. After testing countless pictures of neither fish nor fowl, I finally got the following secret recipe!
If you want to edit one part of a close-up picture, please make sure that part occupies enough space. Then AI will assist you better to identify

If the background of original image is white, you need to use the [Erase] tool to erase the white background and enter the prompt to generate, otherwise you will get the original image

If people’s faces are small in your image, changing background may be a better option.The writer recommends that you do not randomly try to change the face or the hands of the figure, because the body parts of real humans seem to be the knowledge blind spots of AI

3. Size
Currently, three sizes of images are supported, which are similar to 1:1, 16:9 and 9:16.
– The first size is recommended if you want to generate images of people or objects with outstanding detail
– If you want to turn the generated image into a video, it is recommended to use the second and third sizes, which are compatible with short videos and long videos respectively
– Of course, you can choose the size you want, we won’t limit it in case there are surprises
4. Resolution
At present, we provide 1k images by default, and of course we will provide users with 4k pixel options in the future~
5. How to check my history?
In your history, you can delete that photo you are unsatisfied with
Comments
Post a Comment